Grill Setup Methods: Master the Art of Perfect Outdoor Cooking
Grilling is more than just cooking food outdoors. It is a blend of skill, science, and creativity. Whether you are a beginner or an experienced griller, setting up your grill the right way can make a big difference. The grill setup method determines how heat reaches your food, how flavors develop, and how successful your cookout will be. With many grill types and techniques available, it is easy to get confused. This guide breaks down the most effective grill setup methods, explains when to use each, and shares real-world tips that many overlook. By the end, you will understand how to choose and use the best setup for every grilling situation.
Charcoal Grill Setup Methods
Charcoal grills offer a unique smoky flavor, but the way you arrange the charcoal affects everything. There are several ways to set up a charcoal grill, each suited for specific foods and occasions.
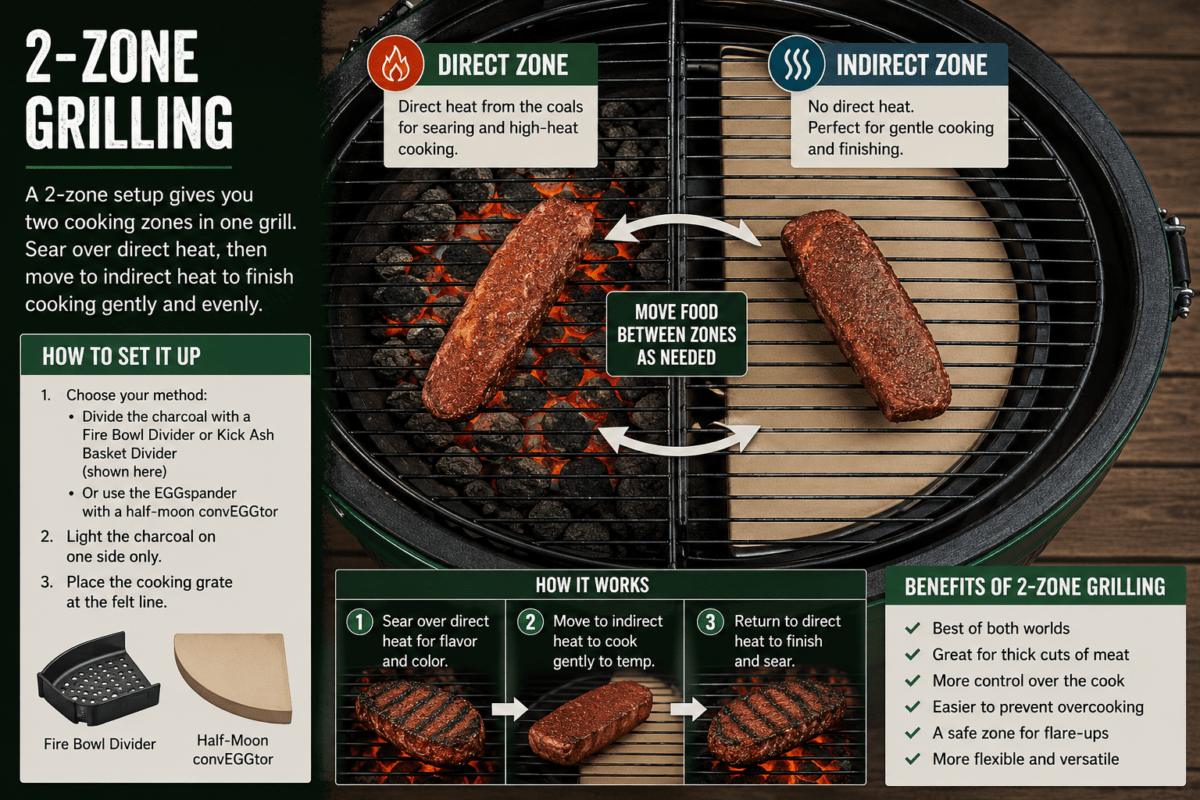
The Two-zone Setup
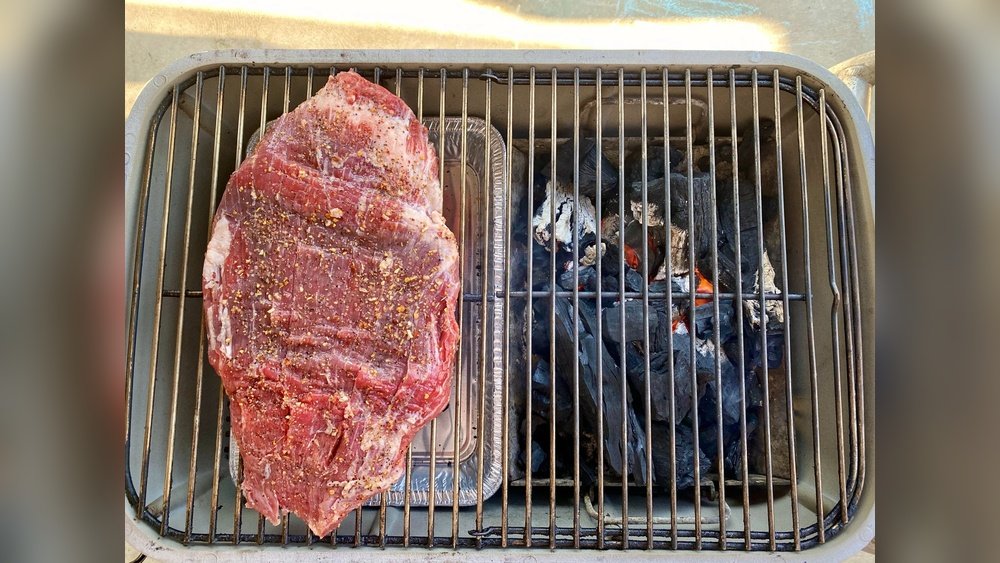
The two-zone setup is a classic and versatile method. You divide the grill into two sections—one with hot coals and one without. This gives you both direct and indirect cooking areas.
- Arrange coals on one side: Fill half of the grill with lit charcoal, leaving the other half empty.
- Sear and finish: Use the hot side for searing meat, then move it to the cooler side to finish cooking gently.
This setup is perfect for thick steaks, chicken breasts, and sausages. It lets you control heat and avoid burning delicate foods.
The Three-zone Setup
A three-zone setup is less common but very helpful for bigger grills or large gatherings.
- Divide into three areas: Place more charcoal on one-third for high heat, less on the next third for medium heat, and leave the last third empty for no heat.
- Cook different foods: High heat for searing, medium for cooking, and no heat as a safe zone.
This is ideal for cooking various foods at once, like burgers, vegetables, and buns.
The Snake Method
The snake method is a slow-cooking technique for smoking or roasting.
- Arrange charcoal in a line: Place briquettes in a curved line (like a snake) along the edge of the grill.
- Add wood chips: Put wood chips on top for smoky flavor.
- Light one end: Light just one end of the snake.
This setup keeps the grill at a low temperature for hours. It is perfect for ribs, brisket, and pulled pork.
The Minion Method
Popular among BBQ enthusiasts, the minion method is used for long, low-and-slow cooks.
- Fill the grill with unlit charcoal: Add a few lit coals on top.
- Charcoal burns gradually: The unlit coals catch fire slowly, maintaining a steady temperature.
This method is best for overnight cooks or smoking large cuts of meat.
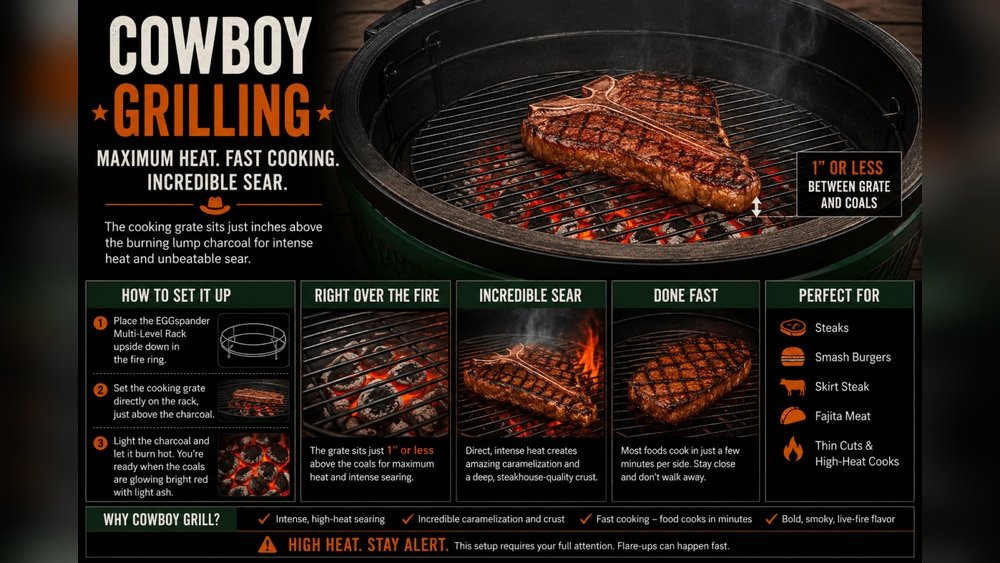
The Caveman Style
The caveman style means cooking food directly on the coals.
- Spread hot coals: Lay out a flat layer.
- Place food directly: Put steak, vegetables, or even bread straight on the coals.
This gives a unique char and smoky taste. It is great for adventurous cooks but needs careful attention to avoid ash sticking.
The Banked Coals Setup
Banked coals are used when you need both high and low heat, but want more control.
- Pile coals on one side: Make a mound of coals on one edge of the grill.
- Leave the other side empty: This creates a cooler zone.
This setup is useful for cooking chicken wings, pork chops, or fish that need both searing and gentle heat.
Charcoal Grill Data Table
Here is a quick comparison of charcoal grill setup methods:
| Setup Method | Best For | Heat Control | Typical Duration |
|---|---|---|---|
| Two-Zone | Steaks, chicken, sausages | High & low | 30–60 min |
| Three-Zone | Mixed grilling | High, medium, low | 30–90 min |
| Snake | Smoking, ribs | Low & slow | 4–8 hrs |
| Minion | Brisket, pork shoulder | Low & steady | 6–12 hrs |
| Caveman | Steak, veggies | Direct | 5–20 min |
| Banked Coals | Chicken, fish | High & indirect | 30–90 min |
Gas Grill Setup Methods
Gas grills are popular for convenience and easy temperature control. But the way you arrange burners and use heat zones makes a big impact.
Direct Heat Setup
The direct heat setup is simple—turn on all burners and cook food right above the flame.
- All burners on: Preheat the grill with all burners set to high.
- Cook directly: Place food over the burners.
This setup is best for thin cuts like burgers, hot dogs, and shrimp. The high heat cooks food quickly.
Indirect Heat Setup
For larger or thicker foods, the indirect heat setup is essential.
- Turn off some burners: Leave one or two burners off.
- Place food away from flame: Put food on the side with no flame.
This prevents burning and allows gentle cooking. It is ideal for whole chickens, roasts, and thick pork chops.
Two-zone Gas Setup
You can create two zones on a gas grill, similar to the charcoal method.
- Set one side high: Turn burners on one side to high.
- Set other side low or off: Leave the other side on low or off.
This lets you sear on the hot side and finish on the cooler side.
Multi-zone Gas Setup
Larger grills with three or more burners can make a multi-zone setup.
- High, medium, and low: Set different burners to different levels.
- Cook multiple foods: Use high for searing, medium for cooking, low for warming.
This is great for parties and cooking different dishes at once.
Rotisserie Setup
Many gas grills have a rotisserie attachment. This method uses indirect heat and slow rotation.
- Set burners to low: Only use burners on the sides.
- Insert rotisserie rod: Place meat (like chicken or roast) on the rod.
The rotation cooks food evenly and keeps it juicy.
Smoking On A Gas Grill
Gas grills are not famous for smoke, but you can add flavor with a smoker box.
- Fill smoker box with wood chips: Place it over a burner.
- Cook using indirect heat: Let smoke build while food cooks away from the flame.
This adds a smoky taste to ribs, chicken, or fish.
Gas Grill Data Table
Compare gas grill setup methods:
| Setup Method | Best For | Heat Control | Typical Duration |
|---|---|---|---|
| Direct Heat | Burgers, shrimp, hot dogs | High | 5–15 min |
| Indirect Heat | Whole chicken, roasts | Low & indirect | 1–3 hrs |
| Two-Zone | Steaks, sausages | High & low | 20–60 min |
| Multi-Zone | Mixed grilling | High, medium, low | 30–90 min |
| Rotisserie | Chicken, roast beef | Rotating, indirect | 1–2 hrs |
| Smoking | Ribs, fish, poultry | Low & smoky | 1–4 hrs |
Pellet Grill Setup Methods
Pellet grills use wood pellets for heat and flavor. They offer digital controls for temperature, but setup choices still matter.
Standard Pellet Setup
Most pellet grills have a main cooking area with heat from a firepot.
- Fill hopper with pellets: Choose your wood type.
- Set desired temperature: Use digital controls.
This setup is great for everything from steaks to vegetables.
Two-zone Pellet Setup
Some pellet grills offer a two-zone cooking area.
- Use the main area for high heat: Cook meats needing searing.
- Use secondary area for indirect: Finish or smoke foods gently.
It is useful for thick cuts or foods needing different heat.
Smoking Setup
Pellet grills excel at smoking.
- Set low temperature: Usually between 180–225°F.
- Cook for hours: Let smoke flavor build.
Use this setup for brisket, ribs, and pulled pork.
Searing On A Pellet Grill
Pellet grills are not famous for high heat. Some models have a sear zone.
- Switch to sear mode: Open flame or higher heat.
- Sear meats quickly: Get a nice crust.
If your grill lacks this, finish steaks in a pan for extra crust.
Reverse Sear Method
This is a favorite among steak lovers.
- Start with low heat: Smoke or cook steak gently.
- Finish with high heat: Sear for a crisp crust.
Reverse sear gives a tender inside with a flavorful outside.
Pellet Grill Data Table
Pellet grill setups compared:
| Setup Method | Best For | Heat Control | Typical Duration |
|---|---|---|---|
| Standard | General grilling | Digital, precise | 20–90 min |
| Two-Zone | Steaks, thick cuts | High & low | 30–90 min |
| Smoking | Brisket, ribs | Low & smoky | 4–12 hrs |
| Searing | Steaks, burgers | High | 5–20 min |
| Reverse Sear | Steaks | Low then high | 40–90 min |
Electric Grill Setup Methods
Electric grills are easy to use and safe for indoor cooking. They lack the smoky flavor of charcoal or pellets but can still give tasty results with the right setup.
Standard Electric Setup
Most electric grills have a single heating element.
- Plug in and preheat: Wait until the grill is hot.
- Cook directly: Place food on the grill surface.
This setup is simple and fast. It works well for burgers, fish fillets, and vegetables.
Two-zone Electric Setup
Some electric grills offer adjustable heat zones.
- Set one side higher: Use for searing.
- Set other side lower: Use for finishing or gentle cooking.
This lets you cook thick steaks or chicken evenly.
Panini Press Or Contact Grill Setup
Panini presses are electric grills with top and bottom heating.
- Preheat both plates: Wait until ready.
- Cook food between plates: Grill sandwiches, meats, or veggies.
This setup gives grill marks and cooks food quickly.
Smokeless Electric Setup
Some new electric grills come with smokeless technology.
- Fill water tray: Reduces smoke and odor.
- Cook as usual: Good for indoor spaces.
This is ideal for apartments or places where smoke is a problem.
Tips For Electric Grilling
- Always preheat fully for best results.
- Use a thermometer to check food temperature.
- Clean grill plates often to avoid sticking.

Credit: bbqchamps.com
Infrared Grill Setup Methods
Infrared grills use radiant heat for intense, even cooking. They are famous for high temperatures and quick searing.
Direct Infrared Setup
Infrared burners heat the cooking surface directly.
- Turn on burners: Preheat for a few minutes.
- Cook food above burners: Sear steaks, burgers, or seafood.
This setup is perfect for fast, high-heat cooking.
Indirect Infrared Setup
Some infrared grills allow indirect cooking.
- Use a mix of infrared and standard burners: Place food away from direct heat.
- Cook slowly: Good for thicker cuts.
This lets you cook larger meats without burning.
Infrared Rotisserie Setup
If your grill has a rotisserie, use infrared for even browning.
- Turn on infrared burner: Set to low or medium.
- Cook meat on rotisserie: Get a crisp outside and juicy inside.
Searing Zone Setup
Many infrared grills have a dedicated searing zone.
- Preheat searing burner: Usually very hot.
- Sear steaks or seafood: Get restaurant-quality results.
Portable And Specialty Grill Setup Methods
Sometimes you need a grill that is easy to move or suited for special cooking styles.
Portable Charcoal Grill Setup
Small charcoal grills are great for picnics and camping.
- Use fewer coals: Enough for quick cooking.
- Set up two zones: Even small grills can have hot and cool sides.
Hibachi Setup
Hibachi grills are simple, open grills with direct heat.
- Fill with charcoal: Spread evenly.
- Cook food directly: Usually thin meats or vegetables.
Hibachis are fast and fun but require careful attention.
Kamado And Ceramic Grill Setup
Kamado grills (like Big Green Egg) are versatile.
- Use lump charcoal: For better flavor and heat.
- Set up for direct or indirect: Adjust vents and arrange coals.
Kamados excel at both grilling and smoking.
Smoker Setup
Dedicated smokers are designed for low-and-slow cooking.
- Fill firebox with fuel: Charcoal, pellets, or wood.
- Set airflow and temperature: Use vents and dampers.
Smokers are perfect for brisket, pork shoulder, and ribs.
Vertical Grill Setup
Some grills are vertical, with food hanging over heat.
- Hang meat: Often used for shawarma or kebabs.
- Cook slowly: Heat rises and cooks food evenly.
Vertical grills are popular for specialty dishes.

Credit: diocesisdecordoba.es
Planning Your Grill Setup: Key Factors
Choosing the right grill setup is not just about the grill type. Several factors can influence your method and success.
Food Type
Different foods require different heat and setups.
- Thin meats: Use direct, high heat.
- Thick cuts: Start indirect, finish with searing.
- Vegetables: Medium heat, indirect preferred for delicate veggies.
Cooking Time
Consider how long you need to cook.
- Quick foods: Direct setups work best.
- Slow cooks: Indirect, snake, or minion methods are ideal.
Flavor Goals
Do You Want Smoky Flavor Or Crisp Sear?
- Smoke: Use wood chips, snake method, pellet smoking.
- Sear: Infrared, direct heat, searing zones.
Grill Size And Shape
Larger grills allow more zones and flexibility.
- Small grills: Stick to two-zone setups.
- Big grills: Try multi-zone or specialty setups.
Weather And Location
Wind, rain, and space can affect your setup.
- Wind: Can cool the grill and affect cooking times.
- Rain: Choose covered setups or electric grills.
- Apartment: Use smokeless electric grills or indoor-safe options.
Fuel Efficiency
Some setups use more fuel than others.
- Direct heat: Fast but less efficient for long cooks.
- Indirect/snake/minion: More efficient for slow cooking.
Safety
Always prioritize safety:
- Keep grills away from flammable materials.
- Use heat-resistant gloves.
- Monitor children and pets around hot grills.
Non-obvious Insights For Better Grilling
Many grillers miss these important tips:
- Preheat zones separately: Always preheat each zone individually. It ensures even cooking and stops food from sticking.
- Layer flavors: Add herbs or citrus peels to your charcoal or pellet hopper. It gives subtle, unique tastes.
- Let meat rest: Always rest grilled meats for 5–10 minutes. It keeps juices inside and improves flavor.
- Flip only once: Flipping meat just once helps develop better grill marks and keeps food moist.
- Use two thermometers: One for grill temperature, one for food. This prevents overcooking and undercooking.
Credit: thebbqbuddha.com
Common Mistakes And How To Avoid Them
Even experienced grillers make errors. Here are some to watch for:
- Crowding the grill: Causes uneven cooking and steam instead of sear.
- Skipping preheat: Leads to sticking and uneven results.
- Wrong setup for food: Using direct heat for thick cuts can burn outside and leave inside raw.
- Ignoring weather: Wind and rain can change temperatures. Adjust fuel and placement as needed.
- Not cleaning the grill: Old grease and bits can ruin flavor and cause flare-ups.
Real-world Examples
Example 1: Grilling Steak On A Charcoal Grill
A thick ribeye needs both searing and gentle cooking. Use a two-zone setup. Sear for 2–3 minutes on the hot side, then move to the cool side and cook until desired doneness. Rest before serving.
Example 2: Smoking Ribs On A Pellet Grill
Set the pellet grill to 225°F, fill with hickory pellets, and use the smoking setup. Cook ribs for 5–6 hours, adding wood chips for extra smoke. Finish with sauce and a quick sear if desired.
Example 3: Cooking Chicken On A Gas Grill
Use indirect heat. Place chicken away from the flame, cook for 1–2 hours, and finish with a quick sear. This keeps chicken juicy and avoids burning.
Example 4: Searing Burgers On An Infrared Grill
Preheat the infrared burner, cook burgers for 4–5 minutes per side, and enjoy a crisp crust with juicy inside.
Example 5: Grilling Vegetables On An Electric Grill
Set the grill to medium-high, preheat for 10 minutes, and cook sliced veggies for 8–10 minutes, flipping halfway.
Grill Setup Comparison Table
To help decide which grill setup suits your needs, compare across grill types:
| Grill Type | Setup Flexibility | Flavor Potential | Ease of Use |
|---|---|---|---|
| Charcoal | High (multiple setups) | Very high (smoky) | Moderate (needs practice) |
| Gas | High (easy zones) | Medium (can add smoke) | Easy |
| Pellet | Medium (digital controls) | High (wood flavor) | Easy |
| Electric | Low–medium | Low (less smoke) | Very easy |
| Infrared | Medium (searing zones) | Medium (crisp sear) | Easy |

Advanced Setup Tips
If you want to step up your grilling game, try these advanced ideas:
- Use heat shields: Some grills let you add shields or plates to control heat and prevent flare-ups.
- Experiment with wood types: Different woods (apple, cherry, mesquite) give unique flavors.
- Try reverse searing: Perfect for thick steaks—slow cook first, then sear.
- Adjust air vents: On charcoal and kamado grills, use vents to control temperature.
- Multi-layer cooking: Use grill racks to cook at different heights for more control.
Cleaning And Maintenance After Setup
A well-maintained grill keeps setup methods effective.
- Clean grates after every use.
- Check burners, fireboxes, and pellet hoppers for buildup.
- Empty ash trays and grease pans.
- Oil grates to prevent sticking next time.
A neglected grill can ruin your setup and flavor.
How To Choose Your Grill Setup
Choosing the right setup depends on your needs:
- Quick meals: Use direct heat setups.
- Large gatherings: Multi-zone or three-zone setups.
- Smoked foods: Snake, minion, pellet smoking, or dedicated smokers.
- Indoor grilling: Electric or smokeless setups.
- Specialty dishes: Vertical, rotisserie, hibachi, or kamado.
Experiment often. Try new setups and record your results. Over time, you will know what works best for your grill, food, and guests.
Frequently Asked Questions
What Is The Best Grill Setup For Steak?
The reverse sear method on pellet or charcoal grills is often best. Start steak on low heat, then sear over high heat for a crisp crust and juicy center. On gas or infrared grills, use a two-zone setup.
How Do I Smoke Food On A Gas Grill?
Use a smoker box filled with wood chips. Place it over a burner, then cook food using indirect heat away from the flame. This adds a smoky flavor to meats and fish.
Can I Grill Indoors Safely?
Yes, use electric grills or smokeless grills. Always check local regulations and never use charcoal or gas grills indoors due to carbon monoxide risk.
Why Is My Food Sticking To The Grill?
Sticking is usually caused by improper preheating or dirty grates. Always preheat the grill and oil the grates. Clean after each use for best results.
How Do I Set Up A Grill For Vegetables?
Use indirect or medium heat zones. Place vegetables away from direct flame, flip halfway, and monitor for softening without burning.

Grilling is both science and art. With the right setup method, you can create amazing meals for any occasion. Whether you choose charcoal, gas, pellet, electric, or infrared, understanding and mastering grill setup methods is the secret to successful outdoor cooking. Remember to experiment, keep safety in mind, and enjoy the process. For more detailed tips and research, visit Serious Eats. Happy grilling!